Site – management of users and roles
- Beginning in the Blackbird® Control Centre
- Logging in to your Blackbird Control Centre
- Site and account management onboarding
- Best Practice
- Configuration of file and logging metadata
- User levels/roles
- Who’s using what?
- Media / asset handling features for manager status users
- Launching Forte, the Blackbird cloud video editor
Beginning in the Blackbird® Control Centre
The Blackbird® cloud url lands on the Blackbird Control Centre, expecting your given Blackbird username and password. At this point you have several choices of action.
Once authenticated, depending upon your account settings, you could:
-
configure settings in the account for your work team
-
create publishing tasks as pre-set buttons, to set those tasks in motion
-
launch Forte, the Blackbird cloud video editor
-
professionally edit video for production use (even live video)
-
work with your distributed team in the cloud from anywhere
-
no waiting on decisions – publish in-progress work, reviewable anywhere
-
-
upload graphics; sound; metadata or other documents used in production
-
inspect arrivals folders; media area; or publishing areas, for new content
-
examine usage statistics if your account is set so

Logging in to your Blackbird Control Centre
The Blackbird Control Centre is entirely web-based (as distinct from the Blackbird Cloud Video Editor, which also runs on a computer as an application). The Blackbird login page is your cluster prefix at the https://blackbird.video domain. From this page enter your unique User ID and password, click Enter and you shall see the Blackbird start page:

-
The name of your project
-
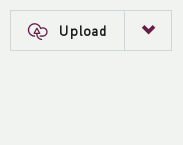
The Upload button for additional documents and media (with options)
-
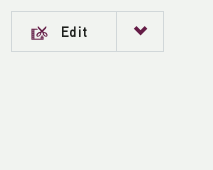
The Edit button which launches into Forte, the Blackbird cloud video editor
-
 This cog icon is present if a user has manager-level account settings, allowing configuration
|
The “cog” icon drop-down menu, for users with appropriate status
The “cog” symbol: Among the ones you could find useful immediately are:
|


-
An account (in this case, one of our own demo accounts)
-
Another account, but the user here is without manager status, hence no configuration “cog” is visible
-
A configuration cog is visible on this account, however, because the user has manager status within that account
You will see all of your Blackbird account(s) and projects from here, each account having a separate panel with interface launch buttons. These buttons indicate which tasks a given account permits, contingent upon the access level assigned by the account manager. The task buttons typically might include “Upload”; “Review”; “Log”; “Edit”.
The “Upload” button is not generally used for getting your video shoot into the cloud – that is what the Blackbird Edge Server is for. The “Upload” button is for adding to your project various small items of media – sound, graphics, brief video clips, EDLs, and other documents. 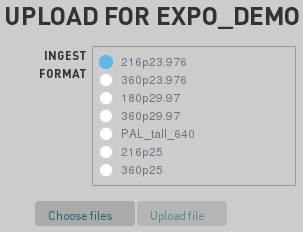
For brief video clips you will see an additional panel of ingest settings for choices of proxy sizes. Shown is an example, on an account we have named Expo_demo, with many options visible. Your account is likely to have a few such settings, contingent upon setup. |
The purpose of the Control Centre is to manage the way that your Blackbird cloud expects to work with acquisition (typically one or more Edge servers), adding value in the form of a production (for example, editing, logging or clipping), and then publishing the results.
Any one of these steps may be configured in a different way from one customer to the next, hence the Blackbird cloud requires a level of customisation per type of usage.
An example of this might be to compare broadcast video with esports – both endeavours use the same Blackbird products to engage in reasonably different workflows.
“One size” in this case would certainly not fit both.
Site and account management onboarding
The administration of the customer aspect of your Blackbird cloud account is achieved through a user with a role that has been set to cloud manager. Similarly, administration of sites is performed by a user with a role set to site management.
Cloud, Sites, accounts and Users overview
The role settings are the crucial factor governing the actions and permissions available to a user. In fact, a user may even have two entirely different roles within two different productions (although this is not frequently the case – more commonly, a user with a role in one is typically also that role in another production).
Best Practice
Syntax for site (internal) and account creation
As a matter of best practice, the naming of sites and productions are encouraged to follow these guidelines:
CUSTOMERNAME_SITE, CUSTOMERNAME_ACCOUNTNAME
The syntax simply involves using your customer name, then underscore, then the site name or account name, ensuring all of this is in upper case.
Setting up master config for sites to cascade down to accounts
Master configurations for sites actually cascade down to become the base configuration for the various associated productions. These may be changed, of course, to tailor the settings per production. For example, publishing ingest frame rates and logging metadata values may require bespoke setups.
Configuration of file and logging metadata
-
Making metadata searchable for other areas in blackbird (site and account level)
-
Hide/show metadata presentation in all accounts (how metadata is inherited from site or set at account)
Media such as video and audio will have accompanying data, which tells us and tells the enclosing systems certain things “about” the media. This is called metadata (data ‘about’ data). There is no fixed list of what constitutes metadata. Some metadata is quite technical, some metadata is descriptive and tells a person what is occurring within the media at any particular time. Some sources will create video with some metadata, other sources will create equivalent video output with much more metadata. In some cases, a limited amount of metadata may even be found in the file or stream itself, in many other cases it rides alongside the file like some kind of “sidecar”. Generally speaking, though, the metadata sits “outside” of the file or stream, but accompanies it through the containing system. At the end, it may also be made available to other systems.
Some users may prefer to see a more extensive set of metadata than other types of user. This is able to be specified at the level of the production, by a user with a role allowing such an admin capability. Ordinarily, the setting is inherited from whatever settings the site level has been set to.
Navigating the hyperlink views
There is a colour coding within the Control Centre, in which the left navigation buttons will have a certain colour filling the background of the active button. The colours are:
- Purple
-
Purple indicates that you are in an area of the Control Centre concerned with the Blackbird cloud.
- Claret
-
Claret indicates that you are in an area of the Control Centre concerned with a production.
- Orange
-
Orange indicates that you are in an area of the Control Centre concerned with Sites, or in some cases, groups of sites.
The administration of users may well be executed from within any of the above three areas. However, in any case you will be put back into the Cloud area (showing a Purple button background), but without the other cloud buttons. You will only see Home; Configuration; Edge Servers buttons on the left sidebar.
Within the Control Centre you will see a line of text underneath the “Blackbird” logotype near the top, which we call a “breadcrumb trail”. As with any application or site featuring a breadcrumb trail, the purpose of this is to find your way back from where you came. Ours differs from most breadcrumb trails in that it allows you to jump to other positions, also.
For example, if you are at a User page (cloud area – purple button), your breadcrumb trail will show the site the user is associate with (in orange), followed by the user you are administering (in grey). Clicking on the site part of the breadcrumb (in orange) will jump you to the site landing page (configuration section, in orange) rather than wherever you came into the user admin page from.
User levels/roles
For example: editor; clipper; reviewer; viewer; logger; account manager).
Creation of human users and associating role (how they inherit a view)
From the home page (the page you see immediately after login) you can add users either for a production (your “account”), or your whole site. To create a user (for example, you may have a new person on your team who requires setting up to perform work) we follow the following steps. The person following these steps for creating a user must be a (site or production) admin, or higher.
-
This landing page (under the search field) displays “Cloud” admin buttons, and under that are entries for different productions. You may see only one production and are likely to see fewer “Cloud” area buttons (here we show most possible buttons). Click on Sites in the top area “Cloud” buttons.
 Figure 3. After login is this landing page. Click
 -
You will see the site(s) available to you listed as a table row, the “Name” column entry links to the site administration itself. Note the “breadcrumb” line under the Blackbird logo says “Cloud” at present, as you just came from one of the admin buttons in the “Cloud” area on the top of the previous page. Also, the side toolbar button “Sites” is purple.

One path from here is to click the “Name” entry of your site. This takes you to a site configuration screen (the “breadcrumb” will say “Site” and the side toolbar Config button will be orange). Click the Users button in the sidebar to go to a site “Users” table, then click the Create button underneath this table. Similarly, you are able to delete a user this way.


Another path from the aforementioned purple “Cloud” Sites table is to click on the entry in the “Users” column, which will place you directly at the same orange “Users” table shown above, where you would use the Create button underneath.
-
If you do not see “Sites” in the top “Cloud” area (typically due to your role settings), then use the “Cog” menu “Users” menu item alongside your production entry. Here is the home/landing page once more and the menu is shown “dropped down” as if you have clicked the “cog”.
You will be placed at a (claret, not orange) Users screen, which at first lists the users of that production in a table.

The listing view may be collapsed (click on where it says “Users with access” and you will then see other drop-down headings including “Add Users To Production (account)”.

This contains a search field into which you may enter a user name, by full name or email, or partial name, or even an existing Blackbird username. If this is a totally new user to the Blackbird system, add them by their email address.
|
Don’t click on the top panel button Users for this purpose, as that route will only show you users without allowing adding any. Users are added in association with a production or site. |
Adding users at the site level gives you more control
As discussed, users can be added at the site level (using the “Cloud” config buttons) and at the production level (using the “Cog” menu). It is suggested, however, that as a matter of practice users should where possible be added at site level. The advantage being that it will give you more control. Once the user exists at the site level, they are then available to be included in various productions, and have various roles assigned.
Creation of users at the account level
The creation of users at the production level (account level) is nevertheless a viable option, and will set a new user up whilst also including them within that production and with an assigned role. It also posts an invitation to the user for them to agree to the account creation (which, if they have received it, inherently verifies that the correct contact email address had been entered).
Give usernames following the Blackbird syntax
As a matter of manageability, it is suggested that users are named following the Blackbird syntax of alphanumeric first and second initial, followed by a number (e.g. hd91).
Creation of Edge users
An Edge server is also classified as a user. In most ways the process of setting up an Edge server as a user resembles that of setting up a human user. The creation of Edge users depends upon connection to the Blackbird cloud, as the Edge requires authentication to the cloud.


From here you have control over the administration of the Edge server as a user, in the same way that it would be if it were a human user.
Clicking on the Edge servers button in the left sidebar menu will take you back to the choosing page for all of your Edge servers, if you have more than one.

Who’s using what?
The main effect of differences to account settings which a user at a given level will experience is largely concerned with what they will (or will not) see. Consequently, this governs the choice of actions they are able to take.
In media industries such as yours, the work will frequently belong to a project, the project may commonly constitute a series or sequence of episodes or instances or shows. Working the other way out, each project will form a part of an overall portfolio of product for that production house, broadcaster or syndication source. Hence, some staff working on some of these categories do not need access to (or even need to know the existence of) other such categories within an account. A production may or may not overlap the assets or requirements of another production from the same organisation. An episode or show may or may not share assets or content with another show or episode of the same series.
Of course, different clients will have different organisational structures for their work and workforce, hence the apparently complex approach to account management.
Access levels
In addition to your Blackbird account, you will have an “access level” associated with a “role” (assigned by a holder of the account manager role). As an example, some frequently encountered roles are “Reviewer”; “Logger”; “Editor”. A visible effect of changing an access level is that certain features, buttons, controls will be present or absent in the user-interface layout. This can become evident when a user can access more than one Blackbird account or project and their roles differ in each (not a common occurrence but not impossible either in organisations with more than one output in production at a given time – usually a person would have the same role if they are in more than one account).

Blackbird has several pre-set user access levels, already defined for commonplace role types. This helps a “turnkey” setup get up to speed quickly. Further roles with custom access and feature visibility may be defined by the account manager.
Settings for launching
The standard program operating settings of the interface (typical for most computers, in most situations) are in effect when you click the button for your chosen task. These settings pertain to whether a computer might have a lot or little memory, and how audio is handled (which becomes evident when voiceover is required). To help when using certain low-end computers, there are some customised variants of the program settings applied upon launch.

- Edit – default action
-
When clicked as a button, rather than selecting one of the drop-down menu items, Blackbird will run using the normal memory requirement.
- Edit – Low Memory
-
This decreases the cache size requirements.
- Edit – Browser
-
Launches in a browser window (required for the Java app, where the “Java runtime” is not allowed to be installed on corporately owned computers).
- Edit – Browser Low Memory
-
A combination of both of the above options.
- Edit – Voiceover
-
This will demand a high memory footprint (although most reasonably-well specified modern computers should suffice in this) and also allows the audio input architecture to run, for voiceover recording requirements.
| Edit – Voiceover is only available to a user if the account manager has set it to be so. |
| The downloadable “Java Runtime” (which allows Java programs to run) will normally have to be installed on the intended computer, unless you are using our new JavaScript version of the Blackbird cloud video editor – our full-specification professional video editor capable of running entirely in a browser. If you need the Java Runtime, download it (free) from www.java.com and pick the one relevant to the computer operating system you intend to install it on. |
Media / asset handling features for manager status users
As mentioned above, different user ‘roles’ are often set to differentiate the features available to users on different projects within their accounts. One such example is found in the sidebar – the Media button, which is only present if the user has been given the appropriate manager status. The following describes the use of the Media button
Browsing media residing on a Blackbird Edge / cloud
In the Blackbird control centre there are many tasks and destinations available. For a user with a manager status it is useful to be able to quickly browse available media. This is possible from within the Blackbird control centre (contingent upon the user’s role).

-
Blackbird control centre toolbar, the Media button shows this view
-
The name of the account
-
‘Files’ on Blackbird cloud or Edge Servers.
-
Search box
-
Search for either Files (or just:
Name;Reel name;Notes;Disk label;start timecode;end timecode) or Metadata (or just:Shot;Sync;Disk label;Good take;subtitle) -
Press to search (or type the return key)
-
Add another search condition for combinations (such as ‘apple’ in the Files
Namebut also with ‘fruit’ in the MetadataShot)
-
Select one / more than one / all that you see, and show either source clips; edited sequences or both
-
The icon in the top left shows that this is a folder – hover over for more information about it
-
The icon in the top left shows that this is a single media asset (a “file”) – again, hovering over shows more info.
On files and folders you’ll notice a coloured stripe running horizontally through the centre separating image from text. This is a status indicator, much like a progress bar, indicating the state of the ingest. Clicking any of these folders will show the files or further folders they contain.
Each actual video file is represented by a thumbnail, name, proxy size, active tracks and duration. Double-clicking on a video file will open up a video player in the control centre itself.
| Again, these features will only be evident (from the Media toolbar side button) if the user has the required manager status. A logger or reviewer, for example, will not see this, or many other media asset management features. |

-
A video player panel (although it can do more than merely play)
-
Name of the source clip, edited file or other production asset
-
Clip saving button
-
Video image play area
-
Blackbird Waveform – a remarkable production-oriented user interface handle
-
Zoom in, or out again with Secondary-click (or Option+click/Alt+click)
Also use your mouse scrollwheel to zoom in and out. Click and drag to scrub or jump to different points.
-
Time / timecode of current play position
-
Six buttons, three either side of time display, for single-frame / play / leader, in either direction
-
Set ‘in’ + ‘out’ markers with displays, selection duration in the middle
All of these numbers: timecode; in; out; duration, are each editable by typing directly into them.
-
The folder we are within
-
Right-side information panel – this shows the ‘Details’ tab, there are two more
Detailed information on the right of the window
Along with said player, more extensive detailed information about the particular video file playing is available on the panel to the right of the player. For media assets such as video clips, three tabs are visible:
- Details
-
Identification details of various kinds.
- Media data
-
The file name and a list of shots entered from logging sessions.
- Locations
-
Where on the Blackbird cloud or Blackbird Edge Servers the media exists, and in which forms (proxy / original).
Other media types will display different tabs, for example edits or selections will show a “Sequence” and “Sources” and “Previous versions” tab, as these media are actually types of EDL (edit decision list).
Launching Forte, the Blackbird cloud video editor
From the Blackbird control centre, clicking Edit will launch Forte, the Blackbird cloud video editor.
| Clicking on Edit will launch the Blackbird Forte cloud video editor. The button also has dropdown menus: Default is “high memory”, which will launch Java with about 1GB RAM allocated to it; “low memory” only uses about 400MB RAM. There are additionally browser options, which are similar, but launch Blackbird Forte within a browser window. Edit – voiceover is for real-time voiceover, and has elevated priviledges to allow access to popups, using only about 400MB RAM. |
Adding multiple users
To add a list of users, visit your site’s “users” page and click the “Import from CSV” button.
Select a .csv file of the following structure: * The first row should contain the column headers “fullname”, “company”, “email”, with each following row containing a new user * A new user’s “fullname” should be formatted as “Firstname [optional middle names] Lastname” * “company” is optional but can be of any textual format * “email” should be in a standard email address format
Comma separated values for auto entry of data for users
CSV, or comma-separated values, are a very widespread lightweight format for containing data which may be structured in a tabular form (that is, laid out in a table).
All of us frequently lay out data in a spreadsheet, but the essential idea of tables and tabular columns remains. Hence, most spreadsheets allow exporting a table to a plain-text format which separates each column across the width of each line (that is, a “row”, in table terminology) with a comma. This makes comma-separated value files very easy to transport and export/import between any spreadsheet a person might be using, and even text editors will allow readability. Other applications make use of .csv format to import or export tabular data, too.
Next concept ⍈ Cloud – Edge Server management